Hai problemi con qualcosa?
Ti abbiamo coperto. Il tuo successo è la nostra priorità numero uno.
Accedi al portale di supporto
Se sei un cliente Condeco esistente e richiedi assistenza, ti preghiamo di accedere al portale self-service di Condeco.
Supporto utente Condeco
Se non si è un amministratore di Condeco ma si hanno problemi con il nostro software, si prega di contattare le proprie aziende Amministratore di Condeco: saranno in grado di supportarvi direttamente e registrare eventuali richieste di supporto per vostro conto.
Richiedi l’accesso all’assistenza
Se è necessario accedere al portale di supporto per registrare un ticket, si prega di compilare questo modulo per ottenere il set-up con un account di supporto!
Risposte rapide di Condeco
Come resettare la tua password
How to reset your password
*This article applies to Condeco Cloud only.
Password resets are handled by your organisation’s own internal procedures. This article aims to help understand which department you may need to contact within your organisation.
What authentication type are you using?
Your account may use Forms-based authentication or Single Sign-On (SSO). To determine how to reset your password, you need to understand which method you use.
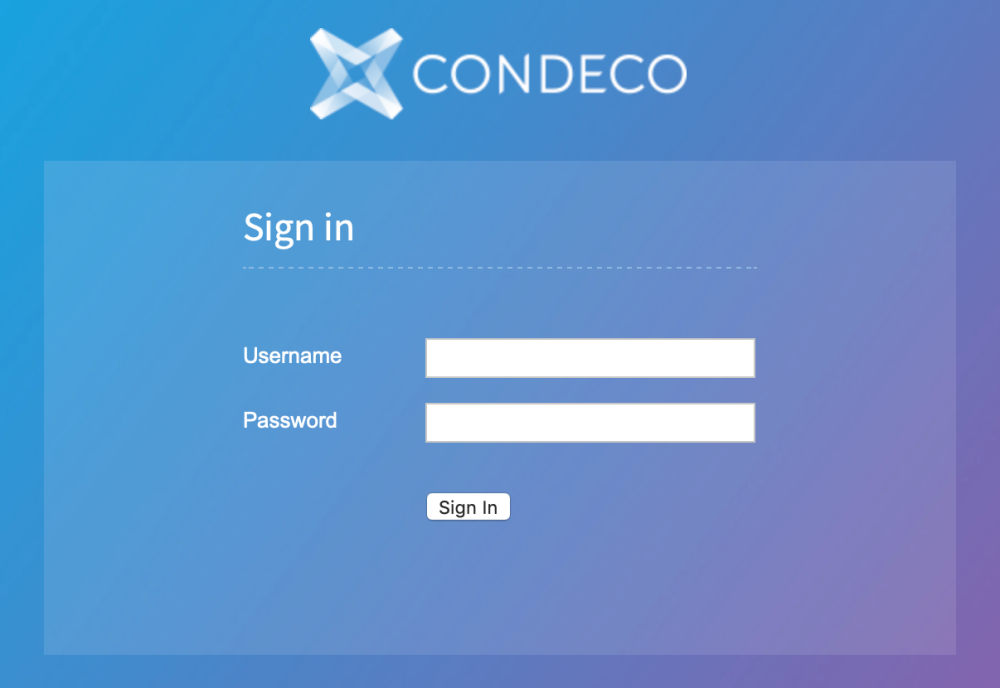
If you log in to Condeco using the following screen, you are using Forms authentication, else you are using SSO Authentication.
Who to contact next
- To request a password reset for Forms authentication, contact your Condeco administrator.
- To request a password reset for SSO authentication, contact your IT administrator.
Come installare il componente aggiuntivo di Outlook
How to install the Outlook Add-in
Condeco Outlook Add-in allows your to search for and book Condeco meeting rooms directly from Outlook.
Room bookings are linked to your appointment or meeting invitation.
Attendees are automatically carried through to your Condeco room booking.
You can add additional services such as catering to your booking.
You can create a conference by adding more rooms.
Moving your appointment or meeting invitation will automatically try to move the room in Condeco.
Installing the add-in
Condeco Outlook Add-in is installed by your administrator through Group Policy, or manually using an MSI package. You can see if you have Condeco Outlook Add-in installed by opening Outlook and creating a new Appointment.
In the ribbon, you should see the following buttons:

If this toolbar is not visible, contact your Condeco or IT administrator to get the add-in installed.
Configuration and login
Your add-in will be pre-configured by your administrator depending on your business requirements and your authentication type. If you are unsure what authentication type you are using, follow the instructions for Forms authentication and check Step 2 for the login settings.
To log in using Forms authentication
- From the main Outlook window (not within a new appointment), click File > Options > Add-ins and click Add-in Options…
- At the bottom of the popup, you should see Login Settings where you can put your username and password.
Note: if you do not see Login Settings, then you are using SSO authentication. - Enter your username and password and click Save. Check that your credentials are confirmed.
- Click OK to close the window.
- Open a New Appointment from your Outlook calendar. Ensure that the date and time of the appointment is in the future, and it’s not an ‘all day’ appointment.
- Click Room Booking from the toolbar.
- If you have not logged in previously, you will be taken to your company’s SSO login page.
- Put in your credentials and continue.
- If you have authenticated successfully, you should now see the Find a room page in your appointment window.
To log in using Single Sign-On (SSO) authentication
- Open a New Appointment from your Outlook calendar. _Ensure that the date and time of the appointment is in the future, and it’s not an ‘all day’ appointment.
- Click Room Booking from the toolbar.
- If you have not logged in previously, you will be taken to your company’s SSO login page.
- Put in your credentials and continue.
- If you have authenticated successfully, you should now see the Find a room page in your appointment window.
Find available rooms
Once you have successfully logged in, you will see the Find a room page. From this page, you can search for available rooms that meet your requirements.
- Select your Country, Region, Location.
- Select the Group and floor. You can select multiple Groups and floors by holding Ctrl/Cmd.
Note: These can be remembered for next time by clicking Set as default. - If you know the room you would like, you can enter its name in the Room field.
- Add another other additional requirements such as room setup, attributes.
- Adjust the number of attendees as necessary. The attendee count is taken from the number of people in your ‘to’ list. They are automatically added onto your booking.
- Click Find.
Selecting a room
After you have entered your requirements in Find a room, you will be shown a list of available rooms that can either be self-booked or requested, depending on your company’s configuration of Condeco.
Book now or request
- The Book Now button is shown against rooms that can be booked without requiring approval from an administrator
- The Request button is shown against rooms that must be approved by administrator before they are confirmed. You will get a provisional booking added to your appointment.
Room information
To see more information about the room, you can click the blue ‘i’ icon to the left of the room name.
Room setup
You can see the available room setups in the Setup dropdown. If the default room configuration does not cater for the number of attendees in your meeting invitation, it will automatically select a room setup that does. You can adjust the room setup now, or you can do it directly on the booking form in the next step.
Note: changing the room setup may add setup or clean down time on your booking.
Finalising your booking
Once you have selected your room, you will be shown the Booking Form. From this page you will be able to add the rest of your meeting details, add services or more rooms. Attendees are automatically carried through to the Attendees tab.
For more details on how to use the Booking Form, see this article.
After you have completed all the required details, click Book or Request. You must then Save your appointment or Send the invitation if you meeting has attendees.
Room Grid
The room grid is an alternative way to find a room. It allows you to see an overview of rooms across countries, locations or groups.
Creating a new grid
- First you must create a new grid by clicking Create new grid.
- Select the Room type, Country, Region, Location, Booking access, Group and Floor.
- Add additional filters, for example whiteboard.
- Click Add rooms to grid.
- Save the grid with a meaningful name.
Booking a room
You can book a room directly from the grid.
- Choose an available slot in between the red tramlines.
- If you want to create a conference with more rooms, click Create conference and select additional rooms, else click Finalise booking.
- You will now be taken to the Booking Form where you can add more details and finalise your booking.
Cancelling a booking
To cancel the room booking without cancelling your meeting or appointment
- Open the meeting or appointment from your Outlook calendar.
- Click Cancel booking from the toolbar.
To cancel the room booking and your meeting or appointment.
- Right click on your meeting or appointment from the Outlook calendar window and select Delete.
- Your room booking will also be deleted.